5 Easy Valentine Crafts for Kids That are Budget-Friendly
This blog post may contain affiliate links.
Valentine’s Day is the perfect time to make memories with your little ones. I’ve got you covered if you’re looking for quick, fun activities. These easy Valentine’s crafts for kids are simple enough for tiny hands but creative enough to entertain everyone. From heart-shaped creations to cute February crafts, these projects are a great way to celebrate love and laughter together. Let’s make this Valentine’s Day extra special without the stress!
1. Paper Heart Garland
A paper heart garland is a sweet and simple way to add Valentine’s charm to any space. It’s a perfect February craft for kids since it’s easy to make, fun to design, and lets their creativity shine. Stringing hearts together will keep your little ones busy and be a fun family activity. Plus, it’s a lovely decoration to hang up once you’re done!
Materials Needed
Before we get started, make sure you have everything ready. Don’t worry—this craft uses basic supplies you probably already have at home:
- Colored construction paper (red, pink, white, or any colors you love)
- Scissors (child-safe ones if little hands are involved)
- A pencil or heart-shaped stencil (optional)
- Glue stick or double-sided tape
- Hole punch (optional)
- String, twine, or ribbon
Paper 5 Red Pink Purple Colors Solid Core Scrapbook Paper for Print DIY Crafts Making Supplies
Crafting Steps
Turning simple materials into a heart garland is easier than you might think. Follow these steps, and you’ll have a festive decoration in no time:
- Prepare the paper
Start by folding your construction paper in half. This will help you cut out symmetrical hearts. If you’re using a stencil, trace the heart shape onto the paper with a pencil. - Cut out the hearts
Carefully cut along the outline of the hearts. You’ll need several hearts to make a full garland, so keep cutting! Pro tip: Stack pieces of paper to cut multiple hearts at once for faster results. - Decorate your hearts (optional)
Let the kids get creative! They can add glitter, use markers to draw designs or stick on fun Valentine-themed stickers. This is where their personalities can shine. - Attach hearts to the string
If you’re using a hole punch, make a small hole near the top of each heart and thread the string, twine, or ribbon through. Alternatively, you can use a glue stick or double-sided tape to attach the backs of the hearts directly to the string. Space the hearts evenly for a neat look. - Hang up your garland
Once all the hearts are on the string, find a place to hang it! Drape it along a mantel, a window, or a doorway to spread Valentine’s cheer.
Making a paper heart garland is such an easy Valentine’s craft for kids, yet seeing it hanging up is so rewarding. Whether you keep it simple or add your flair, this DIY project will warm hearts.
2. Handmade Valentine Cards
Making handmade Valentine’s cards is a classic activity and an excellent way for kids to show their creativity. It’s simple and fun and lets their personality shine through every fold and scribble. With just a few basic supplies, kids can create cards that share a little love in the most personal way.
Design Ideas: Suggest simple designs kids can draw or create
Keeping it simple is the way to go when it comes to designs, especially for tiny hands. Here are a few ideas that are easy yet adorable:
- Classic Hearts: Encourage kids to cut out heart shapes from construction paper or draw them directly on the card. They can layer different colors for a 3D effect or decorate each heart with markers, stickers, or glitter.
- Animal-Themed Cards: Turn hearts into animals! A heart shape can become the body of a butterfly, a fish, or even a fox. Add details like eyes, wings, or tails with crayons or glued-on paper cutouts.
- Fingerprint Art: Dip little fingers in paint and press them onto the card to make heart shapes or flowers. It’s messy but so personal!
Coloring Markers for Adults Lettering, Dual Tip Brush Pens for Kids Drawing, Coloring Pens for Art, Journal Planner, Doodle
Writing Messages: Give tips on what messages kids can write inside
The inside of a Valentine’s card is just as special as the outside. Kids might need a little help crafting sweet and thoughtful messages, so here are a few simple suggestions:
- Keep it short and sweet! Messages like “You’re the best!” or “Happy Valentine’s Day!” are perfect and easy to write.
- Help them personalize the card by including the recipient’s name. For example: “Dear Mom, you make my heart happy!”
- Encourage kids to write what they love about the person. A sentence like “You always make me laugh” can go a long way.
- Add a rhyme! Short poems like “Roses are red, violets are blue, I’m so lucky to have a friend like you!” are fun and playful.
- For very young kids, suggest they draw a picture or sign their name with a big, colorful crayon instead of writing a complete message.
3. Heart-Shaped Wreath
A heart-shaped wreath is a beautiful and simple Valentine’s craft that kids will love making. It’s easy, fun, and perfect to hang as a festive decoration. Plus, it’s a wonderful way to keep little hands busy while celebrating the holiday of love. Let’s turn basic supplies into something heartwarming!
What You’ll Need
Before we start, gather the following items. Most of these are everyday supplies you probably have at home:
- Paper plates (one per wreath)
- Construction paper (red, pink, and white work best)
- Scissors (child-safe for younger kids)
- Glue stick or school glue
- Ribbon or string for hanging
- Optional decorations such as glitter, stickers, or markers
Red Ribbon Valentines, Heart Ribbons Craft Satin Valentine's Day Gifts DIY Crafts -3/8IN -110YD
Crafting Steps
Ready to create your heart-shaped wreath? Follow these easy steps, and you’ll have a Valentine masterpiece in no time!
- Prepare the paper plate or a larger circle-shaped piece of cardboard
Cut out the paper plate’s center to create the wreath’s base. You’ll be left with a circular frame that kids can decorate. Don’t worry about perfection here—any uneven edges will be covered later. - Cut-out heart shapes
Grab the construction paper and cut out several heart shapes. For symmetrical hearts, fold the paper half and cut half-heart shapes along the fold. Vary the sizes to add dimension to the wreath. Let the kids take charge here—it’s okay if their hearts aren’t perfect! - Decorate the hearts (optional)
Before attaching the hearts, let the kids add their personal touch. They can draw designs on the hearts with markers, sprinkle on glitter, or stick on Valentine-themed stickers. This step is where their creativity can shine. - Assemble the wreath
Once the hearts are ready, glue them onto the paper plate frame. Overlap them slightly to cover the plate completely and give the wreath a full, layered look. Kids can alternate colors or create a pattern, but even a random arrangement looks adorable. - Add the hanging ribbon
Cut a ribbon or string and glue or tape it to the back of the wreath. This will make it easy to hang the finished craft on a door, wall, or window. - Display your creation!
Hang the wreath in a special spot where everyone can admire it. It’s the perfect touch to brighten up your home or classroom for Valentine’s Day.
4. Heart-Shaped Suncatchers
Kids will love making these bright and beautiful suncatchers to decorate windows. They’re fun to create and light up any room with colorful Valentine’s vibes.
Materials Needed
- Wax paper
- Crayons (broken or old work great)
- Pencil sharpener or grater (to shave the crayons)
- Iron (adult supervision required)
- Scissors
- String or ribbon (optional)
Crafting Steps
- Display your suncatchers
Hang the hearts on windows with string, or tape them up directly for a stunning stained-glass effect! - Shave the crayons
Use a pencil sharpener or grater to create crayon shavings in a mix of Valentine colors like red, pink, and purple. - Prepare the wax paper
Cut two pieces of wax paper of equal size. Sprinkle the crayon shavings evenly on one sheet, leaving a border around the edge. - Seal the design
Place the second piece of wax paper on top. Press with a warm iron (adults only) to melt the crayon bits together and fuse the wax paper. This will create a colorful, marbled effect. - Cut heart shapes
Once cool, cut out heart shapes in various sizes. Add a hole with a punch at the top if you want to hang them.
5. Love Bugs Craft
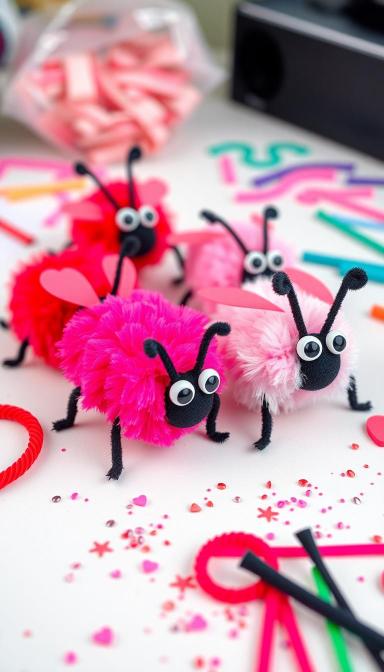
I saved the best for last! Love bugs are one of my favorite February crafts. They’re cute, colorful, and super easy to make. With just a few supplies and a little imagination, kids can create these adorable buggy friends to share as Valentine’s Day gifts, decorations, or even just for fun.
Supplies Needed:
Here’s what you’ll need to create your own lovable bugs. Most of these items are probably already in your home or classroom:
- Small pom-poms (red, pink, white, or any Valentine colors)
- Pipe cleaners (matching or contrasting colors to your pom-poms)
- Googly eyes (tiny ones work best, but any size is fine)
- Glue (a glue gun for older kids or school glue for little hands)
- Craft foam or construction paper (for wings and hearts)
- Scissors
- Optional decorations like glitter, stickers, or small foam shapes
100pcs 1.5 inch Multicolored Large Pompoms for Crafts Art DIY Project in Reusable Zipper Bag
Crafting Steps
Making love bugs is simple and so much fun! Follow these steps for a cute result every time:
- Choose your pom-poms
Pick a medium or large pom-pom for your bug’s body. Encourage the kids to mix colors if they want their bugs to be extra fancy. - Glue on the googly eyes
Add two googly eyes near the top of the pom-pom. This instantly gives your little bug a personality. Pro tip: If using school glue, let the eyes dry for a few minutes before moving to the next step. - Make the antennas
Cut a short pipe cleaner (about 2-3 inches) and fold it in half to create antennas. Curl or bend the ends for extra flair. Secure it to the top of the pom-pom using glue. - Add the wings
Cut out small heart shapes from craft foam or construction paper for the wings. Glue them to the sides or back of the pom-pom, making sure they’re evenly placed. You can even layer two hearts for a multi-colored wing effect! - Personalize your bug
Let the kids decorate their bugs however they like. Add glitter to the wings, stick on tiny foam shapes, or draw hearts and swirls with markers. The more creativity, the better! - Let it dry
Allow your love bugs to set for a few minutes before touching or moving them. This step is key, especially if you’re using school glue. - Display or gift your bugs
Once dry, your love bugs are ready to brighten someone’s day! Use them as Valentine’s decorations, attach them to cards, or give them handmade gifts to family and friends.
Design Tips and Ideas for Love Bugs Craft:
- Play With Colors
Stick to Valentine colors like red, pink, and white, but don’t be afraid to mix in purples, yellows, or even metallic shades for variety. Use multi-colored or glittery pom-poms for extra flair. - Add Unique Features
Wings can be made from patterned scrapbook paper, glitter cardstock, or foil paper to create shiny wings. Hearts don’t have to be perfect—unique shapes add charm! For antennae, twist pipe cleaners into spirals, hearts, and zigzags, or add tiny beads at the ends for detail. Attach small foam or paper heart shapes as feet for a playful touch. - Use Mixed Textures
Combine smooth materials like foam with fluffy pom-poms and shiny googly eyes for an interesting contrast. Add soft feathers or fuzzy felt details to the bug. - Personalize Each Bug
Add a tiny smiling face with markers, or use pieces of craft foam for expressive eyes and mouths. Let kids name their bugs and write the names on the wings or body. Add accessories like miniature bow ties, crowns, or flowers for personality. - Make Themed Variations
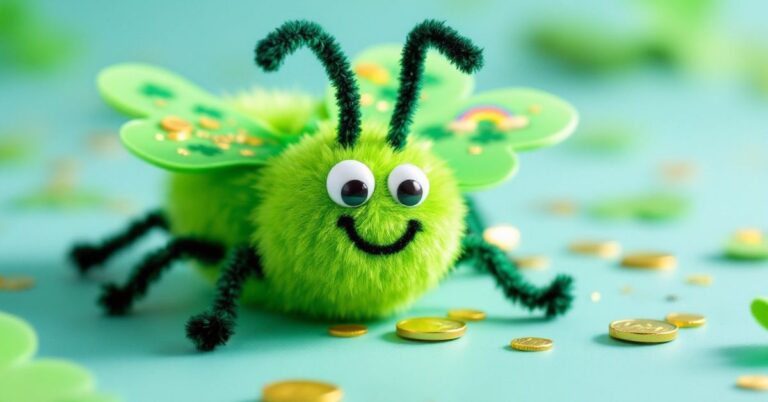
For heart butterfly bugs, add larger wings to resemble a butterfly and use heart-shaped antennas. Use a black pom-pom as the base and add red hearts as dots, like a ladybug. You can also create Cupid bugs by attaching tiny paper arrows or bows to make them Valentine-themed Cupids. - Create a Scene
Place the bugs in a “Love Bug Garden” by gluing them onto a base with fake grass, flowers, or small Valentine-themed items like candy hearts. Make a love bug family by creating different-sized bugs (small pom-poms for kids, larger ones for parents). - Sparkle it Up
Cover the wings or body with glitter glue for a shiny effect. Add rhinestones for a sparkling, luxury bug look. - Attach Gift Tags
Glue a tiny card or tag to the bug that says “Love Bug Hugs!” or “You’re Sweet, Valentine!”, making them adorable holiday favors.
Happy Crafting!
These five easy Valentine’s crafts for kids bring fun, creativity, and family connection into simple projects. Each one is quick to set up, uses everyday supplies, and leaves room for little hands to explore their imagination.
Pick your favorite craft, or try a few, and make this Valentine’s Day special without stress. Don’t forget to snap pictures of the masterpieces and share them with loved ones.
Which of these activities will you try first? Let me know how it goes—I’d love to hear your favorites or see your creations!
For more Valentine’s Day crafts and decorating ideas, follow me on Pinterest!
This blog post may contain affiliate links. If you click on these links and make a purchase, I may earn a commission at no additional cost to you. I only recommend products or services I use and believe will add value to my readers. Please note that I am not responsible for the content, privacy practices, or services of external sites linked within the blog post.


